Guide | Ethereum Staking on Zhejiang Testnet
Become a validator, start staking and help secure Ethereum, a proof-of-stake blockchain. Anyone with 32 ETH can join.
Your Mission - #TestingTheWithdrawalsShanghai
Overview: To participate in the public testnet known as Zhejiang, the first public effort to test Ethereum’s upgrade to enabling validator withdrawals with a hardfork called "Shanghai-Capella" or also known as EIP 4855.
Goals: To test your staking setups, practice voluntary exits and validator withdrawals.
Staked ETH: With the new ability to withdraw staked ETH since beacon chain genesis on December 1 2020, this upgrade to Ethereum POS will add flexibility and attract the next wave of stakers and innovation.
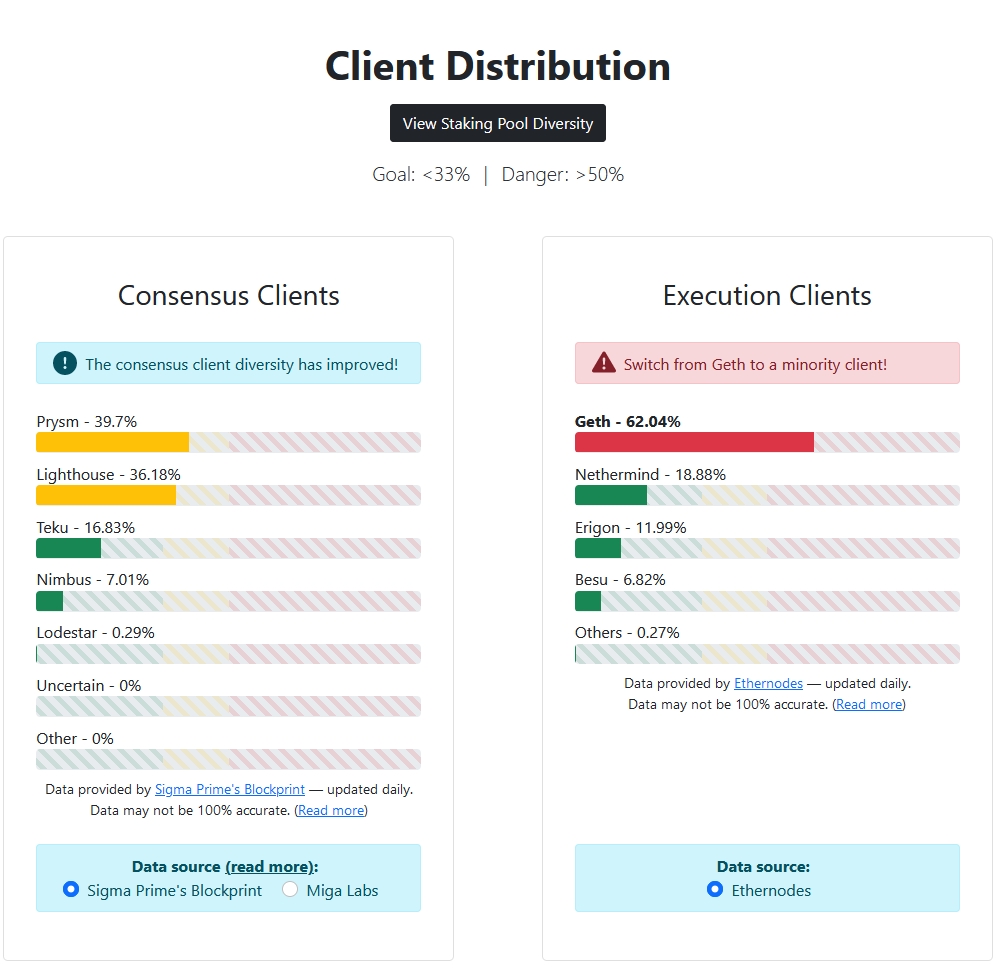
Client Diversity: Within the Ethereum network of nodes, you want to improve Ethereum's client diversity by choosing a minority execution and consensus client combination.
Timeline: Assuming this testnet is thoroughly tested, mainnet Ethereum could be upgraded sometime in March 2023.
As of early February 2023, Besu is the most minority execution client with 6.8% of nodes. Lodestar is by far the most minority consensus client with 0.29% representation.
How Staking on Ethereum Works
Acquire some hardware (laptop, desktop, server) or rent a VPS (cloud server): You need to run a node to stake.
Sync an execution layer client
Sync a consensus layer client
Generate your validator keys and import them into your validator client
Monitor and maintain your node
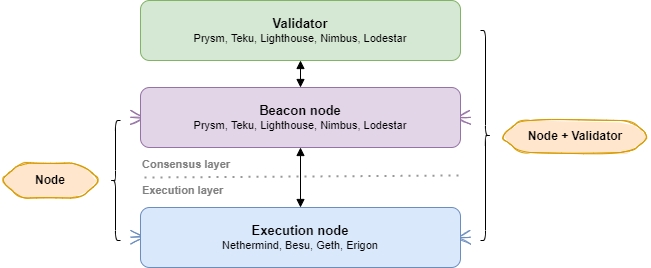
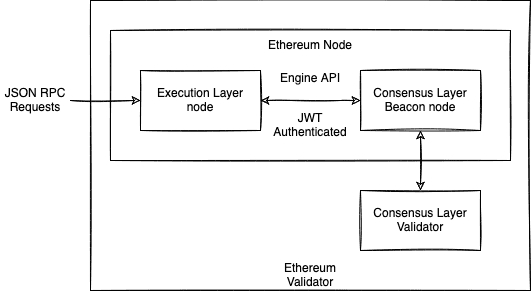
A Ethereum node consists of the Execution Layer + Consensus Layer.
A Ethereum Staking node is the previous plus a Validator client.
Prerequisites
This guide was written for aspiring Ethereum stakers who have basic familiarity with command line tools and it was tested against Ubuntu 22.04.1 LTS client. You’ll want a dedicated cloud VPS or local desktop/server/laptop running a clean install of Ubuntu preferably.
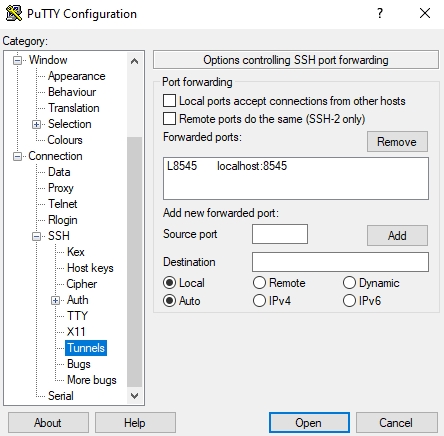
If using a VPS or remote server, install and start the SSH client for your operating system:
Windows: PuTTY
MacOS and Linux: from the Terminal, use the native command:
How to Run Commands
Commands are to be run in a terminal window or ssh terminal.
Commands preceded by
sudowill prompt for your password at first, and periodically afterwards.
Minimum Hardware Requirements
Operating system: 64-bit Linux (i.e. Ubuntu 22.04 LTS Server or Desktop)
Processor: Dual core CPU, Intel Core i5–760 or AMD FX-8100 or better
Memory: 16GB RAM
Storage: 40GB SSD
Recommended Hardware Requirements
Operating system: 64-bit Linux (i.e. Ubuntu 22.04 LTS Server or Desktop)
Processor: Intel i5 or AMD Ryzen 5 or better.
Memory: 32GB RAM
Storage: 2TB SSD or NVME
Network: 100 Mbit or faster connection with at least 2TB per month data plan

Pro Staking Tip: Highly recommend you begin with a brand new instance of an OS, VM, and/or machine. Avoid headaches by NOT reusing testnet keys, wallets, or databases for your validator.
How to participate with Zhejiang
Step 5. Setup Execution Layer Client
Setup your execution layer client, your choice of Nethermind, Erigon, Geth or Besu.
Only one execution layer client is required per node.
Run the following to enable auto-start at boot time.
Finally, start your execution layer client and check it's status.
Press Ctrl + C to exit the status.
Step 6. Setup Consensus Layer Client
Set up your consensus layer client. Your choice of Lighthouse, Nimbus, Teku, Prysm or Lodestar.
Lodestar is a Typescript implementation by the Chainsafe.io team. In addition to the beacon chain client, the team is also working on 22 packages and libraries. Finally, the Lodestar team is leading the Ethereum space in light client research and development and has received funding from the EF and Moloch DAO for this purpose.
Lighthouse is an Ethereum client with a heavy focus on speed and security. The team behind it, Sigma Prime is an information security and software engineering firm who have funded Lighthouse along with the Ethereum Foundation, Consensys, and private individuals. Lighthouse is built in Rust and offered under an Apache 2.0 License.
Teku is a Java-based Ethereum 2.0 client designed & built to meet institutional needs and security requirements. Dedicated to building enterprise-ready clients and tools for interacting with the core Ethereum platform, Teku is Apache 2 licensed and written in Java, a language notable for its maturity & ubiquity.
Nimbus is a research project and a client implementation for Ethereum 2.0 designed to perform well on embedded systems and personal mobile devices, including older smartphones with resource-restricted hardware. The Nimbus team are from Status the company best known for their messaging app/wallet/Web3 browser by the same name. Nimbus (Apache 2) is written in Nim, a language with Python-like syntax that compiles to C.
Prysm is a Go implementation of Ethereum 2.0 protocol with a focus on usability, security, and reliability. Prysm is developed by Prysmatic Labs, a company with the sole focus on the development of their client. Prysm is written in Go and released under a GPL-3.0 license.
Run the following to enable auto-start at boot time.
Finally, start your consensus layer client and check it's status.
Press Ctrl + C to exit the status.
Check your logs to confirm that the execution and consensus clients are up and syncing.
Example of Synced Execution Client Logs
Example of Synced Consensus Client Logs
Press Ctrl + C to exit the logs.
Syncing is complete when your latest block and slot number matches the public block explorers.
Consensus client: check latest slot number with https://zhejiang.beaconcha.in
Execution client: check latest block number with https://blockscout.com/eth/zhejiang-testnet
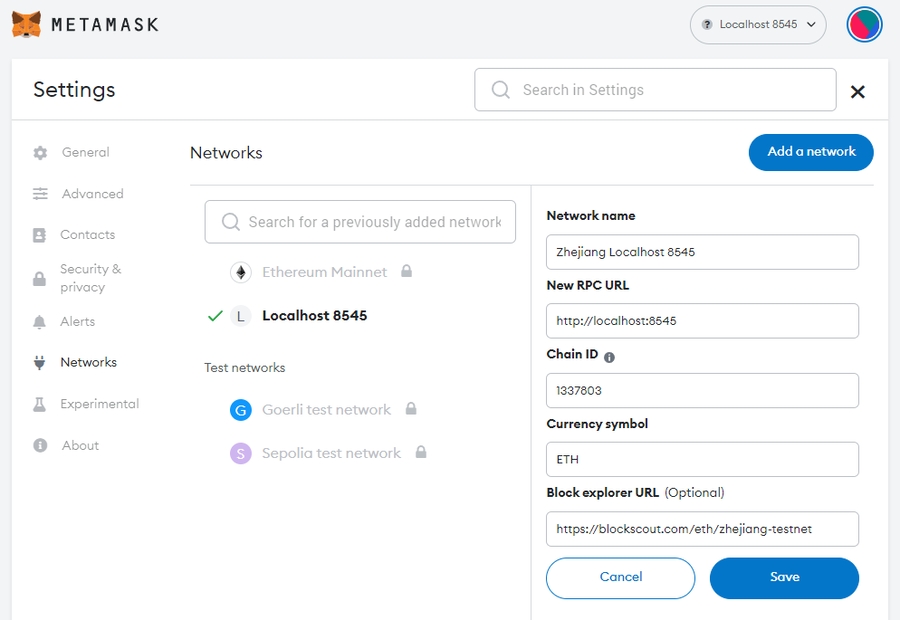
Step 7. Configure MetaMask and Use the Testnet Faucet
Configure your MetaMask to point to the Zhejiang testnet or use your own node.
Use the Testnet faucet to acquire at least 32 Zhejiang testnet ETH for 1 validator. It may take a few moments, sometimes up to an hour, for the funds to appear in your wallet. Or request funds from the ethStaker Discord in the #request-zhejiang-eth channel. Alternatively, use the POW faucet by pk910
Step 8. Generate Validator Keys
With two easy methods, your can setup your mnemonic keys with either:
staking-deposit-cli - the original command line based key generator
Don't lose your keystore password and write down your 24 word secret mnemonic key! Ideally keep this offline but for testnet purposes it's okay to save digitally for your convenience.
Step 9. Sign up to be a Validator at the Launchpad
After running the staking deposit tool, you will have a deposit_data-##########.json file which you'll upload to the Launchpad.
Your deposit_data file is located in the following location:
Ensure your MetaMask is switched to the Zhejiang Testnet network.
Follow along the instructions at the Launchpad. You'll complete this process when you've uploaded your deposit_data-##########.json file and sent the corresponding 32 Zhejiang testnet ETH deposit to the Zhejiang staking deposit address.
After sending the deposit with Metamask, verify your deposit was completed on a block explorer.
Step 10. Setup Validator Client
Run the following to enable auto-start at boot time.
Finally, start your validator client and check it's status.
Check your logs to confirm that the validator clients are up and functioning.
Example of Synced Validator Client Logs
Press Ctrl + C to exit the logs.
🎉Congrats on setting up your Zhejiang “Withdrawals” staking node!
Step 11. Next Steps
As a newly minted Zhejiang Ethereum Staker,
Learn more about what features are introduced and being tested on Zhejiang.
Monitor your validator's earnings and performance at https://zhejiang.beaconcha.in by entering your validator's public key.
Learn to connect your MetaMask wallet to your own execution layer node. See step 7, use my own node.
Additional Commands
Extra Testing Commands
Your Github Contributions Welcome
This guide is fully open source and fully powered by home stakers like you. 🙏
Pull requests or issues can be submitted on github:
Support Us
These guides are solely supported by Gitcoin Grants and donations to our Cointr.ee by stakers like you. 🙏
Marvelous Reference Material
Technical Support and Community
Reddit > https://www.reddit.com/r/ethstaker
Discord > ethStaker > #zhejiang channel
Last Words
I stand upon the shoulders of giants and as such, invite you to stand upon mine. Use my work with or without attribution; I make no claim of "intellectual property." My ideas are the result of countless millenia of evolution - they belong to humanity.

