CoinCashew
Spanish
Spanish
  • Home
  • About Us
  • Donations
  • Contributing
    • Contributor Covenant Code of Conduct
    • Style Guide
  • Disclaimer
  • Wallets
    • Guide: Crypto Wallet Tips 101 - Do's and Don'ts
      • Review: Metal Bitcoin Seed Storage by jlopp
  • Coins
    • Ethereum: ETH
      • ๐Ÿ›ก๏ธEthPillar: one-liner setup tool and node management TUI
      • ๐ŸฅฉGuide | How to setup a validator for Ethereum staking on mainnet
        • Overview - Manual Installation
        • PART I - INSTALLATION
          • Step 1: Prerequisites
          • Step 2: Configuring Node
          • Step 3: Installing execution client
            • Nethermind
            • Besu
            • Geth
            • Erigon
            • Reth
          • Step 4: Installing consensus client
            • Lighthouse
            • Lodestar
            • Teku
            • Nimbus
            • Prysm
          • Step 5: Installing Validator
            • Setting up Validator Keys
            • Installing Validator
              • Lighthouse
              • Lodestar
              • Teku
              • Nimbus
              • Prysm
            • Next Steps
          • Monitoring your validator with Grafana and Prometheus
          • Mobile App Node Monitoring by beaconcha.in
          • Monitoring with Uptime Check by Google Cloud
        • PART II - MAINTENANCE
          • Updating Execution Client
          • Updating Consensus Client
          • Backups Checklist: Critical Staking Node Data
          • Uninstalling Staking Node
          • Finding the longest attestation slot gap
          • Checking my eth validator's sync committee duties
          • Checklist | Confirming a healthy functional ETH staking node
        • PART III - TIPS
          • Voluntary Exiting a Validator
          • Verifying Your Mnemonic Phrase
          • Adding a New Validator to an Existing Setup with Existing Seed Words
          • Switching / Migrating Consensus Client
          • ๐Ÿ›ก๏ธSwitching / Migrating Execution Client
          • โšกUsing Node as RPC URL endpoint
          • Using All Available LVM Disk Space
          • Reducing Network Bandwidth Usage
          • How to re-sync using checkpoint sync
          • Important Directory Locations
          • Improving Validator Attestation Effectiveness
          • EIP2333 Key Generator by iancoleman.io
          • ๐Ÿ˜Geth - Enabling path-based state storage
          • Disk Usage by Execution / Consensus Client
          • Dealing with Storage Issues on the Execution Client
        • Join the Community
        • Credits
        • See Also
        • Changelog
      • โ›“๏ธGuide | How to setup a validator for Ethereum staking on testnet HOLESKY
        • Overview - Manual Installation
        • Step 1: Prerequisites
        • Step 2: Configuring Node
        • Step 3: Installing execution client
          • Nethermind
          • Besu
          • Geth
          • Erigon
          • Reth
        • Step 4: Installing consensus client
          • Lighthouse
          • Lodestar
          • Teku
          • Nimbus
          • Prysm
        • Step 5: Installing Validator
          • Setting up Validator Keys
          • Installing Validator
            • Lighthouse
            • Lodestar
            • Teku
            • Nimbus
            • Prysm
          • Next Steps
        • Maintenance
          • Updating Execution Client
          • Updating Consensus Client
          • Backups Checklist: Critical Staking Node Data
          • Uninstalling Staking Node
      • ๐Ÿ’ฐGuide | MEV-boost for Ethereum Staking
        • MEV Relay List
      • ๐Ÿ”ŽGuide | Recover Ethereum Validator Mnemonic Seed
      • ๐Ÿฆ‰Update Withdrawal Keys for Ethereum Validator (BLS to Execution Change or 0x00 to 0x01) with ETHDO
      • ๐Ÿ“œArchived Guides
        • Guide Version 1 | How to setup a validator for Ethereum staking on MAINNET
          • PART I - INSTALLATION
            • Step 1: Prerequisites
            • Step 2: Configuring Node
            • Step 3: Setting up Validator Keys
            • Step 4: Installing execution client
            • Step 5: Installing consensus client
            • Monitoring your validator with Grafana and Prometheus
            • Mobile App Node Monitoring by beaconcha.in
            • Security Best Practices for your ETH staking validator node
            • Synchronizing time with Chrony
            • Monitoring with Uptime Check by Google Cloud
          • PART II - MAINTENANCE
            • Updating your consensus client
            • Updating your execution client
            • Uninstalling V1 Staking Node
            • Finding the longest attestation slot gap
            • Checking my eth validator's sync committee duties
            • Pruning the execution client to free up disk space
            • Checklist | Confirming a healthy functional ETH staking node
          • PART III - TIPS
            • ๐Ÿ›ก๏ธSwitching / Migrating Execution Client
            • Voluntary Exiting a Validator
            • Verifying Your Mnemonic Phrase
            • Adding a New Validator to an Existing Setup with Existing Seed Words
            • Switching / Migrating Consensus Client
            • Using All Available LVM Disk Space
            • Reducing Network Bandwidth Usage
            • How to re-sync using checkpoint sync
            • Important Directory Locations
            • Hosting Execution client on a Different Machine
            • Adding or Changing Graffiti flag
            • Improving Validator Attestation Effectiveness
            • EIP2333 Key Generator by iancoleman.io
            • Disk Usage by Execution / Consensus Client
            • Dealing with Storage Issues on the Execution Client
          • Join the Community
          • Credits
          • See Also
          • Changelog
        • Guide Version 1 | How to setup a validator for Ethereum staking on testnet GOERLI
          • Step 1: Prerequisites
          • Step 2: Configuring Node
          • Step 3: Setting up Validator Keys
          • Step 4: Installing execution client
          • Step 5: Installing consensus client
        • Guide Version 2 | How to setup a validator for Ethereum staking on testnet GOERLI
          • Step 1: Prerequisites
          • Step 2: Configuring Node
          • Step 3: Installing execution client
            • Nethermind
            • Besu
            • Geth
            • Erigon
          • Step 4: Installing consensus client
            • Lighthouse
            • Lodestar
            • Teku
            • Nimbus
            • Prysm
          • Step 5: Installing Validator
            • Setting up Validator Keys
            • Installing Validator
              • Lighthouse
              • Lodestar
              • Teku
              • Nimbus
              • Prysm
            • Next Steps
          • Maintenance
            • Updating Execution Client
            • Updating Consensus Client
            • Backups Checklist: Critical Staking Node Data
            • Uninstalling Staking Node
        • Guide | Ethereum Staking on Zhejiang Testnet
        • Guide | Besu + Lodestar | Most Viable Diverse Client | Staking Ethereum on Kiln testnet
        • Guide | How to setup a validator for Ethereum staking on Pithos testnet in 10 minutes or less
        • Ethereum Merge Upgrade Checklist for Home Stakers and Validators
        • Guide | Operation Client Diversity: Migrate Prysm to Teku
      • Guide: How to buy ETH
    • Cardano: ADA
      • Guide: How to Set Up a Cardano Stake Pool
        • PART I - INSTALLATION
          • Prerequisites
          • Hardening an Ubuntu Server
          • Setting Up chrony
          • Installing the Glasgow Haskell Compiler and Cabal
          • Compiling Cardano Node
        • PART II - CONFIGURATION
          • Downloading Configuration Files
          • Configuring Legacy Stake Pool Topology
          • Configuring an Air-gapped, Offline Computer
          • Creating Startup Scripts and Services
        • PART III - OPERATION
          • Starting the Nodes
          • Accessing Built-in Help
          • Generating Keys for the Block-producing Node
          • Setting Up Payment and Stake Keys
          • Registering Your Stake Address
          • Registering Your Stake Pool
          • Verifying Stake Pool Operation
          • Configuring Legacy Network Topology
          • Setting Up Dashboards
          • Configuring Slot Leader Calculations
          • Securing Your Stake Pool Using a Hardware Wallet
        • PART IV - ADMINISTRATION & MAINTENANCE
          • Checking Stake Pool Rewards
          • Claiming Stake Pool Rewards
          • Delegating to a Stake Pool
          • Issuing a New Operational Certificate
          • Updating Stake Pool Information
          • Upgrading a Node
          • Retiring Your Stake Pool
          • Auditing Your nodes configuration
          • KES Key Rotation / Operational Certificate Companion Script
        • PART V - TIPS
          • Submitting a Simple Transaction
          • Transferring Files Using SSH
          • Updating Configuration Files
          • Enabling Peer-to-peer Network Topology
          • Uploading Pool Metadata to GitHub Pages
          • Obtaining a PoolTool API Key
          • Configuring Glasgow Haskell Compiler Runtime System Options
          • Reducing Missed Slot Leader Checks and Improving Cardano Node Performance
          • Increasing Swap File Size
          • Setting Up an External Passive Relay Node
          • Setting Up WireGuard
          • Monitoring Node Security Using OSSEC Server and Slack
          • Resetting an Installation
          • Fixing a Corrupt Blockchain
          • Verifying an ITN Stake Pool
          • Fixing the Mnemonic Staking Balance Bug
        • Appendix A - Best Practices Checklist
        • Appendix B - Cardano Resource Index
        • Telegram Chat Channel
        • See Also
        • Credits
      • Guide: How to buy ADA
      • Guide: How to stake ADA
    • Monero: XMR
      • Guide | How to run your own Monero node
      • Guide: How to mine Monero
      • Create a XMR paper wallet
      • External Reading Material
        • Movie: Monero Means Money
        • Guide: Zero to Monero
        • Book: Mastering Monero
Powered by GitBook
On this page
  • Prerequisites
  • Running the prereqs.sh Script
  • Building the Cardano Node and Command Line Interface
  • Using systemd Services
  • Example systemd Commands
  • Filtering Logs
  • Starting the Relay Node
  • Configuring and Reviewing the Relay Node Topology File
  • Configuring Port Forwarding and/or Firewall
  • Configuring Topology for Existing Nodes
  • Restarting Nodes
  • Testing the Connection
Edit on GitHub
  1. Coins
  2. Cardano: ADA
  3. Guide: How to Set Up a Cardano Stake Pool
  4. PART V - TIPS

Setting Up an External Passive Relay Node

This quick start guide walks through setting up an external relay node with the help of CNTOOLs.

PreviousIncreasing Swap File SizeNextSetting Up WireGuard

Major credits and appreciation to the fine folks at for creating and maintaining , a most helpful swiss army knife for pool operators. You MUST be familiar with how and possess before continuing this guide.

Relay nodes do not have any keys, so they cannot produce blocks. Instead, relays act as proxies between the core network nodes and the Internet, establishing a security perimeter around the core, block-producing network nodes. Since external nodes cannot communicate with block-producing nodes directly, relay nodes ensure that the integrity of the core nodes and the blockchain remains intact, even if one or more relays become compromised.

Prerequisites

  • A different server/VM (not located on the same machine as your block-producer node)

Running the prereqs.sh Script

Installs prerequisite dependencies and creates folder structure.

sudo apt-get install curl net-tools
mkdir "$HOME/tmp";cd "$HOME/tmp"
# Install curl
# CentOS / RedHat - sudo dnf -y install curl
# Ubuntu / Debian - sudo apt -y install curl
curl -sS -o prereqs.sh https://raw.githubusercontent.com/cardano-community/guild-operators/master/scripts/cnode-helper-scripts/prereqs.sh
chmod 755 prereqs.sh

# Ensure you can run sudo commands with your user before execution
# You can check the syntax for prereqs.sh using command below:
#
# ./prereqs.sh -h
# Usage: prereqs.sh [-o] [-s] [-i] [-g] [-p]
# Install pre-requisites for building cardano node and using cntools
# -o    Do *NOT* overwrite existing genesis, topology.json and topology-updater.sh files (Default: will overwrite)
# -s    Skip installing OS level dependencies (Default: will check and install any missing OS level prerequisites)
# -i    Interactive mode (Default: silent mode)
# -g    Connect to guild network instead of public network (Default: connect to public cardano network)
# -p    Copy Transitional Praos config as default instead of Combinator networks (Default: copies combinator network)

# You can use one of the options above, if you'd like to defer from defaults (below).
# Running without any parameters will run script in silent mode with OS Dependencies, and overwriting existing files.

./prereqs.sh

Reload environment variables.

. "${HOME}/.bashrc"

To clone the git repository, type:

cd ~/git
git clone https://github.com/input-output-hk/cardano-node
cd cardano-node

To compile binaries, type the following commands where <NodeVersion> is the node version number or branch that you want to build:

git fetch --tags --all
git pull
# For example, to build node version 1.26.2 type git checkout 1.26.2
git checkout <NodeVersion>


$CNODE_HOME/scripts/cabal-build-all.sh

To install the compiled binaries, type:

sudo cp $HOME/.cabal/bin/cardano* /usr/local/bin

To verify that the correct Cardano node and command line versions are installed, type:

cardano-node version
cardano-cli version

Using systemd services to run your Cardano nodes offers the following benefits:

  • Auto-start your node when the computer reboots due to maintenance, power outage, etc.

  • Automatically restart crashed node processes.

  • Maximize your stake pool up-time and performance.

sudo bash -c "cat << 'EOF' > /etc/systemd/system/cnode.service
[Unit]
Description=Cardano Node
After=network.target

[Service]
Type=simple
Restart=on-failure
RestartSec=5
User=$USER
LimitNOFILE=1048576
WorkingDirectory=$CNODE_HOME/scripts
ExecStart=/bin/bash -l -c \"exec $CNODE_HOME/scripts/cnode.sh\"
ExecStop=/bin/bash -l -c \"exec kill -2 \$(ps -ef | grep [c]ardano-node.*.${CNODE_HOME} | tr -s ' ' | cut -d ' ' -f2)\"
KillSignal=SIGINT
SuccessExitStatus=143
StandardOutput=syslog
StandardError=syslog
SyslogIdentifier=cnode
TimeoutStopSec=5
KillMode=mixed

[Install]
WantedBy=multi-user.target
EOF"

sudo systemctl daemon-reload
sudo systemctl enable cnode.service

Nice work. Your node is now managed by the reliability and robustness of systemd. Below are some commands for using systemd.

To confirm that the node service is active, type:

sudo systemctl is-active cnode

To display the status of the node service, type:

sudo systemctl status cnode

To restart the node service, type:

sudo systemctl reload-or-restart cnode

To stop the node service, type:

sudo systemctl stop cnode

To filter logs, type:

journalctl --unit=cnode --since=yesterday

OR

journalctl --unit=cnode --since=today

OR

journalctl --unit=cnode --since='2020-07-29 00:00:00' --until='2020-07-29 12:00:00'

To start the relay node, type:

sudo systemctl start cnode

To install Guild LiveView, type:

cd $CNODE_HOME/scripts
curl -s -o gLiveView.sh https://raw.githubusercontent.com/cardano-community/guild-operators/master/scripts/cnode-helper-scripts/gLiveView.sh
curl -s -o env https://raw.githubusercontent.com/cardano-community/guild-operators/master/scripts/cnode-helper-scripts/env
chmod 755 gLiveView.sh

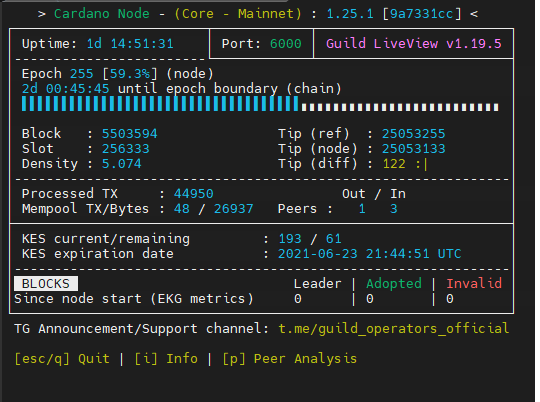
To run Guild Liveview, type:

./gLiveView.sh

Sample output of Guild Live View

nano $CNODE_HOME/scripts/topologyUpdater.sh

Deploy the scripts with deploy-as-systemd.sh to setup and schedule the execution. This will handle automatically sending updates to the Topology Updater API as well as fetching new peers whenever the node is restarted.

$CNODE_HOME/scripts/deploy-as-systemd.sh

Review your topology.json and check that it looks correct. Your new relay node's topology should contain your block producer node, your other relay nodes, and other public buddy relay nodes.

cat $CNODE_HOME/files/topology.json

Specific to your networking setup or cloud provider settings, ensure your relay node's port 6000 is open and reachable.

Additionally, if you have prometheus-node-exporter installed for providing Grafana statistics, then you need to open ports 9100 and 12798. Do not forget to update prometheus.yml on your prometheus server (aka relaynode1). Restart the prometheus service so that the new relay node appears in your dashboard.

Finally, add your NEW relay node IP/port information to your EXISTING block producer and/or relay node's topology file. Modify the CUSTOM_PEERS section of the topologyUpdater.sh script.

For your block producer node, you'll want to manually add the new relay node information to your topology.json file.

Example snippet to add to your block producer's topology file. Add a comma to separate the nodes where appropriate.

 {
    "addr": "<relay node public ip address>",
    "port": 6000,
    "valency": 1
 }

To refresh topology configurations for a node, you need to restart the node.

To restart nodes:

  1. Type:

sudo systemctl reload-or-restart cnode
  1. Repeat step 1 for each node having updated topology configurations.

On the Guild LiveView screen, press P to view the peer list. You should see the connection to other node's IP address.

Did you find our guide useful? Send us a signal with a tip and we'll keep updating it.

It really energizes us to keep creating the best crypto guides.

Familiarize yourself with the created by CNtools.

Building the Cardano Node and Command Line Interface

Using systemd Services

Example systemd Commands

Filtering Logs

Starting the Relay Node

Pro tip: Speed this step up by copying the db folder from another node you control.

For more information, refer to the

Configuring and Reviewing the Relay Node Topology File

Modify the CUSTOM_PEERS section of the topologyUpdater.sh script to configure your relay node's connections to your other relays and block producer node. Refer to the

Configuring Port Forwarding and/or Firewall

Port Forwarding Tip: Check that your relay port 6000 is open with or .

Configuring Topology for Existing Nodes

For relay nodes, or modify the CUSTOM_PEERS section of the topologyUpdater.sh script.

Restarting Nodes

Testing the Connection

Congrats on the new relay node.

Critical Security Reminder: Relay nodes must not contain any operational certifications, vrf, skey or cold` ``` keys.

Congrats on completing the guide.

Use addresses.

Any feedback and all pull requests much appreciated.

Hang out and chat with our stake pool community on Telegram @

๐Ÿคนโ€โ™€๏ธ
โš’๏ธ
โœ…
๐Ÿšง
๐Ÿš€
๐ŸŽ‡
๐Ÿ›‘
๐Ÿ”ฅ
๐Ÿ‘ฉโ€๐Ÿ’ป
๐Ÿ”„
๐ŸŽŠ
โœจ
๐Ÿ”ฅ
โœจ
๐ŸŒ›
๐ŸŒœ
๐Ÿ›ธ
Cardano Community Guild Operators
CNtool
ADA staking works
fundamental Linux system administration skills
folder structure
official Guild Live View docs.
official documentation for more info.
โœจ
https://www.yougetsignal.com/tools/open-ports/
https://canyouseeme.org/
manage your topology file
๐Ÿ™
cointr.ee to find our donation
https://t.me/coincashew