Step 3: Setting up Validator Keys
🌱 Obtain testnet ETH
Every 32 ETH you own allows you to make 1 validator. You can run thousands of validators with your beacon node. However on testnet, please only run 1 or 2 validators to keep the activation queue reasonably quick.
Option 1: Ethstaker's #cheap-goerli-validator Channel
Step 1: Visit the Ethstaker Discord and join the #cheap-goerli-validator channel
Step 2: Use the
/cheap-goerli-depositslash command and follow the instructions from the bot. You need to start typing the slash command and it will show above your input box where you can use it.Requirement: In order to use the cheap goerli validator process, you must now set your withdrawal address to
0x4D496CcC28058B1D74B7a19541663E21154f9c84when creating your validator keys and deposit file. This is to prevent abuses of this service.
Option 2: Watch this how-to youtube video for Goerli ETH
👩💻 Signup to be a validator at the Launchpad
Install dependencies, the ethereum foundation deposit tool and generate your two sets of key pairs.
Each validator will have two sets of key pairs. A signing key and a withdrawal key. These keys are derived from a single mnemonic phrase. Learn more about keys.
You will also set your ETH Withdrawal Address, preferably from your Ledger or Trezor hardware wallet. However, for testnet purposes it's okay to use a browser/hot wallet address.
🛑🛑 DO NOT USE AN EXCHANGE ADDRESS AS WITHDRAWAL ADDRESS. 🛑🛑
🛑🛑 Double check your work as this is permanent once set! 🛑🛑
The Withdrawal Address is:
where your ETH is returned upon "voluntary exiting a validator", or also known as full withdrawal.
where you receive partial withdrawals, which is where any excess balance above 32 ETH is periodically scraped and made available for use.
You have the choice of using the Wagyu GUI, downloading the pre-built Ethereum staking deposit tool or building it from source.
Install dependencies.
Download source code and install.
Make a new mnemonic and replace <ETH_ADDRESS_FROM_IDEALLY_HARDWARE_WALLET> with your ethereum withdrawal address, ideally from a Trezor, Ledger or comparable hardware wallet.
🛑🛑 DO NOT USE AN EXCHANGE ADDRESS AS WITHDRAWAL ADDRESS. 🛑🛑
🛑🛑 Double check your work as this is permanent once set! 🛑🛑
Download staking-deposit-cli.
Verify the SHA256 Checksum matches the checksum on the releases page.
Example valid output:
staking_deposit-cli-ef89710-linux-amd64.tar.gz: OK
Only proceed if the sha256 check passes with OK!
Extract the archive.
Make a new mnemonic and replace <ETH_ADDRESS_FROM_IDEALLY_HARDWARE_WALLET> with your ethereum withdrawal address, ideally from a Trezor, Ledger or comparable hardware wallet.
🛑🛑 DO NOT USE AN EXCHANGE ADDRESS AS WITHDRAWAL ADDRESS. 🛑🛑
🛑🛑 Double check your work as this is permanent once set! 🛑🛑
Wagyu (formerly known as StakeHouse) is an application aimed at lowering the technical bar to staking on Ethereum 2.0.
Dubbed a 'one-click installer', it provides a clean UI automating the setup and management of all the infrastructure necessary to stake without the user needing to have any technical knowledge.
Download Wagyu: https://wagyu.gg
Github: https://github.com/stake-house/wagyu-installer
After creating the validator keys locally, you'll want to copy these validator keys via USB key or rsync file transfer to your staking node.
To align with this guide's steps, first make a default path to store your validator keys.
If using USB key, mount the key then copy.
If using rsync, copy your validator keys from your local computer to your staking node with the following command. Change ssh port if needed.
🔥[ Optional ] Pro Security Tip: Run the staking-deposit-cli tool and generate your mnemonic seed for your validator keys on an air-gapped offline machine booted from usb.
You will learn how to boot up a windows PC into an airgapped Tails operating system.
The Tails OS is an amnesic operating system, meaning it will save nothing and leave no tracks behind each time you boot it.
Part 0 - Prerequisites
You need:
2 storage mediums (can be USB stick, SD cards or external hard drives)
One of them must be > 8GB
Windows or Mac computer
30 minutes or longer depending on your download speed
Part 1 - Download Tails OS
Download the official image from the Tails website. Might take a while, go grab a coffee.
Make sure you follow the guide on the Tails website to verify your download of Tails.
Part 2 - Download and install the software to transfer your Tails image on your USB stick
For Windows, use one of
For Mac, download Etcher
Part 3 - Making your bootable USB stick
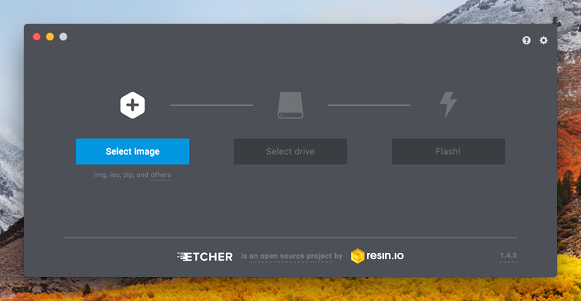
Run the above software. This is an example how it looks like on Mac OS with etcher, but other software should be similar.

Select the Tails OS image that you downloaded as the image. Then select the USB stick (the larger one).
Then flash the image to the larger USB stick.
Part 4 - Download and verify the staking-deposit-cli
You can refer to the other tab on this guide on how to download and verify the staking-deposit-cli.
Copy the file to the other USB stick.
Part 5 - Reboot your computer and into Tails OS
After you have done all the above, you can reboot. If you are connected by a LAN cable to the internet, you can disconnect it manually.
Plug in the USB stick that has your Tails OS.
On Mac, press and hold the Option key immediately upon hearing the startup chime. Release the key after Startup Manager appears.
On Windows, it depends on your computer manufacturer. Usually it is by pressing F1 or F12. If it doesn't work, try googling "Enter boot options menu on [Insert your PC brand]"
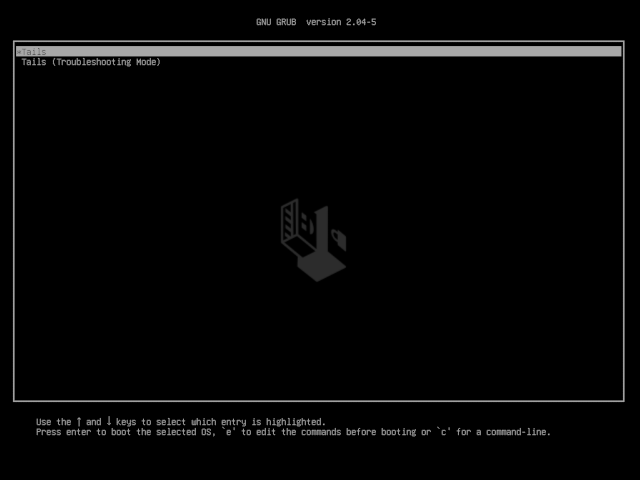
Choose the USB stick that you loaded up with Tails OS to boot into Tails.
Part 6 - Welcome to Tails OS

You can boot with all the default settings.
Part 7 - Run the staking-deposit-cli
Plug in your other USB stick with the staking-deposit-cli file.
Copy the deposit file to your home directory.
Add execute permissions
Make a new mnemonic and replace <ETH_ADDRESS_FROM_IDEALLY_HARDWARE_WALLET> with your ethereum withdrawal address, ideally from a Trezor, Ledger or comparable hardware wallet.
🛑🛑 DO NOT USE AN EXCHANGE ADDRESS AS WITHDRAWAL ADDRESS. 🛑🛑
🛑🛑 Double check your work as this is permanent once set! 🛑🛑
If you ran this command directly from your non-Tails USB stick, the validator keys should stay on it. If it hasn't, copy the directory over to your non-Tails USB stick.
🔥 Make sure you have saved your validator keys directory in your other USB stick (non Tails OS) before you shutdown Tails. Tails will delete everything saved on it after you shutdown..
🎉 Congrats on learning how to use Tails OS to make an air gapped system. As a bonus, you can reboot into Tails OS again and connect to internet to surf the dark web or clear net safely!
2. If using staking-deposit-cli, follow the prompts and pick a KEYSTORE password. This password encrypts your keystore files. Write down your mnemonic and keep this safe and offline.
Do not send real mainnet ETH during this process! 🛑 Use only goerli ETH.
Caution: Only deposit the 32 ETH per validator if you are confident your execution client (ETH1 node) and consensus client (ETH2 validator) will be fully synced and ready to perform validator duties. You can return later to launchpad with your deposit-data to finish the next steps.
3. Follow the steps at https://goerli.launchpad.ethereum.org while skipping over the steps you already just completed. Study the eth2 phase 0 overview material. Understanding eth2 is the key to success!
🐳 Batch Depositing Tip: If you have many deposits to make for many validators, consider using Abyss.finance's eth2depositor tool. This greatly improves the deposit experience as multiple deposits can be batched into one transaction, thereby saving gas fees and saving your fingers by minimizing Metamask clicking.
Make sure to switch to GÖRLI network.
Source: https://twitter.com/AbyssFinance/status/1379732382044069888
4. Back on the launchpad website, upload yourdeposit_data-#########.json found in the validator_keys directory.
5. Connect to the launchpad with your Metamask wallet, review and accept terms. Ensure you're connected to GÖRLI network.
6. Confirm the transaction(s). There's one deposit transaction of 32 ETH for each validator.
For instance, if you want to run 3 validators you will need to have (32 x 3) = 96 goerli ETH plus some extra to cover the gas fees.
Your transaction is sending and depositing your ETH to the goerli ETH2 deposit contract address.
Check, double-check, triple-check that the goerli Eth2 deposit contract address is correct.
🔥 Critical Crypto Reminder: Keep your mnemonic, keep your ETH.
Write down your mnemonic seed offline. Not email. Not cloud.
Multiple copies are better. Best stored in a metal seed.
Make offline backups, such as to a USB key, of your
validator_keysdirectory.