CoinCashew
Spanish
Spanish
  • Home
  • About Us
  • Donations
  • Contributing
    • Contributor Covenant Code of Conduct
    • Style Guide
  • Disclaimer
  • Wallets
    • Guide: Crypto Wallet Tips 101 - Do's and Don'ts
      • Review: Metal Bitcoin Seed Storage by jlopp
  • Coins
    • Ethereum: ETH
      • 🛡️EthPillar: one-liner setup tool and node management TUI
      • 🥩Guide | How to setup a validator for Ethereum staking on mainnet
        • Overview - Manual Installation
        • PART I - INSTALLATION
          • Step 1: Prerequisites
          • Step 2: Configuring Node
          • Step 3: Installing execution client
            • Nethermind
            • Besu
            • Geth
            • Erigon
            • Reth
          • Step 4: Installing consensus client
            • Lighthouse
            • Lodestar
            • Teku
            • Nimbus
            • Prysm
          • Step 5: Installing Validator
            • Setting up Validator Keys
            • Installing Validator
              • Lighthouse
              • Lodestar
              • Teku
              • Nimbus
              • Prysm
            • Next Steps
          • Monitoring your validator with Grafana and Prometheus
          • Mobile App Node Monitoring by beaconcha.in
          • Monitoring with Uptime Check by Google Cloud
        • PART II - MAINTENANCE
          • Updating Execution Client
          • Updating Consensus Client
          • Backups Checklist: Critical Staking Node Data
          • Uninstalling Staking Node
          • Finding the longest attestation slot gap
          • Checking my eth validator's sync committee duties
          • Checklist | Confirming a healthy functional ETH staking node
        • PART III - TIPS
          • Voluntary Exiting a Validator
          • Verifying Your Mnemonic Phrase
          • Adding a New Validator to an Existing Setup with Existing Seed Words
          • Switching / Migrating Consensus Client
          • 🛡️Switching / Migrating Execution Client
          • ⚡Using Node as RPC URL endpoint
          • Using All Available LVM Disk Space
          • Reducing Network Bandwidth Usage
          • How to re-sync using checkpoint sync
          • Important Directory Locations
          • Improving Validator Attestation Effectiveness
          • EIP2333 Key Generator by iancoleman.io
          • 😁Geth - Enabling path-based state storage
          • Disk Usage by Execution / Consensus Client
          • Dealing with Storage Issues on the Execution Client
        • Join the Community
        • Credits
        • See Also
        • Changelog
      • ⛓️Guide | How to setup a validator for Ethereum staking on testnet HOLESKY
        • Overview - Manual Installation
        • Step 1: Prerequisites
        • Step 2: Configuring Node
        • Step 3: Installing execution client
          • Nethermind
          • Besu
          • Geth
          • Erigon
          • Reth
        • Step 4: Installing consensus client
          • Lighthouse
          • Lodestar
          • Teku
          • Nimbus
          • Prysm
        • Step 5: Installing Validator
          • Setting up Validator Keys
          • Installing Validator
            • Lighthouse
            • Lodestar
            • Teku
            • Nimbus
            • Prysm
          • Next Steps
        • Maintenance
          • Updating Execution Client
          • Updating Consensus Client
          • Backups Checklist: Critical Staking Node Data
          • Uninstalling Staking Node
      • 💰Guide | MEV-boost for Ethereum Staking
        • MEV Relay List
      • 🔎Guide | Recover Ethereum Validator Mnemonic Seed
      • 🦉Update Withdrawal Keys for Ethereum Validator (BLS to Execution Change or 0x00 to 0x01) with ETHDO
      • 📜Archived Guides
        • Guide Version 1 | How to setup a validator for Ethereum staking on MAINNET
          • PART I - INSTALLATION
            • Step 1: Prerequisites
            • Step 2: Configuring Node
            • Step 3: Setting up Validator Keys
            • Step 4: Installing execution client
            • Step 5: Installing consensus client
            • Monitoring your validator with Grafana and Prometheus
            • Mobile App Node Monitoring by beaconcha.in
            • Security Best Practices for your ETH staking validator node
            • Synchronizing time with Chrony
            • Monitoring with Uptime Check by Google Cloud
          • PART II - MAINTENANCE
            • Updating your consensus client
            • Updating your execution client
            • Uninstalling V1 Staking Node
            • Finding the longest attestation slot gap
            • Checking my eth validator's sync committee duties
            • Pruning the execution client to free up disk space
            • Checklist | Confirming a healthy functional ETH staking node
          • PART III - TIPS
            • 🛡️Switching / Migrating Execution Client
            • Voluntary Exiting a Validator
            • Verifying Your Mnemonic Phrase
            • Adding a New Validator to an Existing Setup with Existing Seed Words
            • Switching / Migrating Consensus Client
            • Using All Available LVM Disk Space
            • Reducing Network Bandwidth Usage
            • How to re-sync using checkpoint sync
            • Important Directory Locations
            • Hosting Execution client on a Different Machine
            • Adding or Changing Graffiti flag
            • Improving Validator Attestation Effectiveness
            • EIP2333 Key Generator by iancoleman.io
            • Disk Usage by Execution / Consensus Client
            • Dealing with Storage Issues on the Execution Client
          • Join the Community
          • Credits
          • See Also
          • Changelog
        • Guide Version 1 | How to setup a validator for Ethereum staking on testnet GOERLI
          • Step 1: Prerequisites
          • Step 2: Configuring Node
          • Step 3: Setting up Validator Keys
          • Step 4: Installing execution client
          • Step 5: Installing consensus client
        • Guide Version 2 | How to setup a validator for Ethereum staking on testnet GOERLI
          • Step 1: Prerequisites
          • Step 2: Configuring Node
          • Step 3: Installing execution client
            • Nethermind
            • Besu
            • Geth
            • Erigon
          • Step 4: Installing consensus client
            • Lighthouse
            • Lodestar
            • Teku
            • Nimbus
            • Prysm
          • Step 5: Installing Validator
            • Setting up Validator Keys
            • Installing Validator
              • Lighthouse
              • Lodestar
              • Teku
              • Nimbus
              • Prysm
            • Next Steps
          • Maintenance
            • Updating Execution Client
            • Updating Consensus Client
            • Backups Checklist: Critical Staking Node Data
            • Uninstalling Staking Node
        • Guide | Ethereum Staking on Zhejiang Testnet
        • Guide | Besu + Lodestar | Most Viable Diverse Client | Staking Ethereum on Kiln testnet
        • Guide | How to setup a validator for Ethereum staking on Pithos testnet in 10 minutes or less
        • Ethereum Merge Upgrade Checklist for Home Stakers and Validators
        • Guide | Operation Client Diversity: Migrate Prysm to Teku
      • Guide: How to buy ETH
    • Cardano: ADA
      • Guide: How to Set Up a Cardano Stake Pool
        • PART I - INSTALLATION
          • Prerequisites
          • Hardening an Ubuntu Server
          • Setting Up chrony
          • Installing the Glasgow Haskell Compiler and Cabal
          • Compiling Cardano Node
        • PART II - CONFIGURATION
          • Downloading Configuration Files
          • Configuring Legacy Stake Pool Topology
          • Configuring an Air-gapped, Offline Computer
          • Creating Startup Scripts and Services
        • PART III - OPERATION
          • Starting the Nodes
          • Accessing Built-in Help
          • Generating Keys for the Block-producing Node
          • Setting Up Payment and Stake Keys
          • Registering Your Stake Address
          • Registering Your Stake Pool
          • Verifying Stake Pool Operation
          • Configuring Legacy Network Topology
          • Setting Up Dashboards
          • Configuring Slot Leader Calculations
          • Securing Your Stake Pool Using a Hardware Wallet
        • PART IV - ADMINISTRATION & MAINTENANCE
          • Checking Stake Pool Rewards
          • Claiming Stake Pool Rewards
          • Delegating to a Stake Pool
          • Issuing a New Operational Certificate
          • Updating Stake Pool Information
          • Upgrading a Node
          • Retiring Your Stake Pool
          • Auditing Your nodes configuration
          • KES Key Rotation / Operational Certificate Companion Script
        • PART V - TIPS
          • Submitting a Simple Transaction
          • Transferring Files Using SSH
          • Updating Configuration Files
          • Enabling Peer-to-peer Network Topology
          • Uploading Pool Metadata to GitHub Pages
          • Obtaining a PoolTool API Key
          • Configuring Glasgow Haskell Compiler Runtime System Options
          • Reducing Missed Slot Leader Checks and Improving Cardano Node Performance
          • Increasing Swap File Size
          • Setting Up an External Passive Relay Node
          • Setting Up WireGuard
          • Monitoring Node Security Using OSSEC Server and Slack
          • Resetting an Installation
          • Fixing a Corrupt Blockchain
          • Verifying an ITN Stake Pool
          • Fixing the Mnemonic Staking Balance Bug
        • Appendix A - Best Practices Checklist
        • Appendix B - Cardano Resource Index
        • Telegram Chat Channel
        • See Also
        • Credits
      • Guide: How to buy ADA
      • Guide: How to stake ADA
    • Monero: XMR
      • Guide | How to run your own Monero node
      • Guide: How to mine Monero
      • Create a XMR paper wallet
      • External Reading Material
        • Movie: Monero Means Money
        • Guide: Zero to Monero
        • Book: Mastering Monero
Powered by GitBook
On this page
  • How Staking on Ethereum Works
  • Introduction
  • Terminology
  • How to Run Commands
  • Skills for operating an staking node
  • Experience required to be a successful ETH Staker
  • Minimum Node Setup Requirements
  • Recommended Node Setup Requirements
  • Local Node vs Remote Node
  • Setup Ubuntu
  • Setup Metamask
  • High Level Validator Node Overview
Edit on GitHub
  1. Coins
  2. Ethereum: ETH
  3. Archived Guides
  4. Guide Version 2 | How to setup a validator for Ethereum staking on testnet GOERLI

Step 1: Prerequisites

PreviousGuide Version 2 | How to setup a validator for Ethereum staking on testnet GOERLINextStep 2: Configuring Node

How Staking on Ethereum Works

  1. Acquire some hardware (laptop, desktop, server) or rent a VPS (cloud server): You need to run a node to stake.

  2. Sync an execution layer client

  3. Sync a consensus layer client

  4. Generate your validator keys and import them into your validator client

  5. Monitor and maintain your node

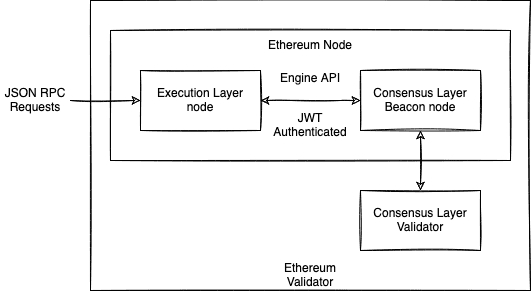
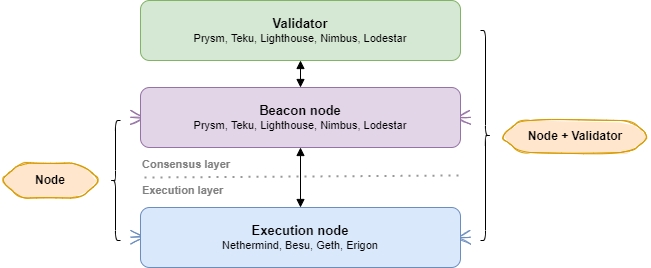
A Ethereum node consists of the Execution Layer + Consensus Layer.

A Ethereum Staking node is the previous plus a Validator client.
This guide was written for aspiring Ethereum stakers who have basic familiarity with command line tools and it was tested against Ubuntu 22.04.1 LTS client. You’ll want a dedicated cloud VPS or local desktop/server/laptop running a clean install of Ubuntu preferably.

Terminology

Your Ethereum staking node may be

  • Local: on a laptop / PC / NUC that you can physically connect keyboard/mouse/monitor.

  • Remote: in the cloud on a VPS

If your staking node is remote, then you will want to setup SSH, secure shell.

If using a VPS or remote node, install and start the SSH client for your operating system:

MacOS and Linux: from the Terminal, use the native command:

ssh <YourUserName>@<YourServersIP>
  • Commands are to be run in a terminal window or ssh terminal.

  • Commands preceded by sudo will prompt for your password at first, and periodically afterwards.

As a validator for Ethereum, you will typically have the following abilities:

  • operational knowledge of how to set up, run and maintain a Ethereum consensus client, execution client and validator continuously

  • a long term commitment to maintain your validator 24/7/365

  • basic operating system skills

  • Operating system: 64-bit Linux (i.e. Ubuntu 22.04.1 LTS Server or Desktop)

  • Processor: Dual core CPU, Intel Core i5–760 or AMD FX-8100 or better

  • Memory: 16GB RAM

  • Storage: 1TB SSD for testnet

  • Internet: Stable broadband internet connection with speeds at least 5 Mbps upload and download.

  • Internet Data Plan: At least 2 TB per month.

  • ETH balance: at least 32 ETH and some ETH for deposit transaction fees

  • Wallet: Metamask installed

Once done with testnet staking, this hardware configuration would be suitable for a mainnet staking node.

  • Operating system: 64-bit Linux (i.e. Ubuntu 22.04.1 LTS Server or Desktop)

  • Processor: Quad core CPU, Intel Core i7–4770 or AMD FX-8310 or better

  • Memory: 32GB RAM

  • Storage: 2TB NVME

  • Internet: Stable broadband internet connections with speeds at least 10 Mbps without data limit.

  • Data Plan: At least 2 TB per month. Ideally, no data cap or unlimited data plan.

  • ETH balance: at least 32 ETH and some ETH for deposit transaction fees

  • Wallet: Metamask installed

Decision: Do I run my Ethereum staking node locally at home or rent a VPS cloud server remotely? Here's a list of criteria to help you decide.

Criteria
Local Node
Remote Node

Ongoing Costs

Plus - No fees, besides internet bill and electricity.

Minus - Monthly or Annual reoccurring rental fees.

Hardware Maintenance

Minus - Do it yourself if hardware issues.

Plus - Included, covered by hosting provider.

Internet

Minus - Can slow down home internet and use up data plan (if not unlimited) Budget for at least 2TB per month data plan.

Plus - Often plans are generous and more than sufficient for an ETH node.

Reliability

Minus - Do it yourself with UPS, redundant internet connections, computer issues

Plus - Hosted in a data center with multiple power/internet backups.

Barrier to Entry

Plus - Can re-use or re-purpose existing hardware Minus - Initial cost to purchase new computer equipment

Plus - Renting a VPS might require a lower initial investment as you can pay monthly.

Decentralization

Plus - Home staking is the gold standard for Ethereum decentralization, nothing bets it!

Customization

Plus - More fine control over hardware configuration

Minus - May be limited choices and hardware can be shared. For example, a common issue is insufficient disk storage I/O speeds (IOPS).

Security

Plus - Enterprise-grade, professional data centers.

Minus - Not your hardware, not your node. It's possible the hosting provide can view your node's contents.

Freedom

Plus - Do whatever you want. Plan your own upgrades. Minus - With great freedom and power, you are solely responsible for your node.

Plus - Professionally managed.

Minus - At the mercy of the host's actions, data center outages are possible.

With your local or remote node, now you need to install an Operating System. This guide is designed for Ubuntu 22.04.1 LTS.

When the time comes to make your validator's 32ETH deposit(s), you'll need a wallet to transfer funds to the beacon chain deposit contract.

At the end of this guide, you will build a staking validator node that hosts three main components in two layers: consensus layer consists of a consensus client, also known as a validator client with a beacon chain client. The execution layer consists of a execution client, formerly a eth1 node.

Validator client - Responsible for producing new blocks and attestations in the beacon chain and shard chains.

Consensus client - Responsible for managing the state of the beacon chain, validator shuffling, and more.

Execution client - Supplies incoming validator deposits from the eth mainnet chain to the beacon chain client.

Introduction

Windows:

Here's a to connect by SSH to your remote node.

How to Run Commands

Skills for operating an staking node

Experience required to be a successful ETH Staker

have perused the vast tomes of the

have learned the essentials by watching

have passed or is actively enrolled in the

and have read the

Minimum Node Setup Requirements

Power: Reliable electrical power. Mitigate with a .

Recommended Node Setup Requirements

Power: Reliable electrical power with a .

Hardware Builds: For examples of actual staking hardware builds, check out and .

Yorick's Storage Advice: Refer to Yorick's Great and less great SSDs for Ethereum nodes:

Pro Validator Tip: Highly recommend you begin with a brand new instance of an OS, VM, and/or machine. Avoid headaches by NOT reusing testnet keys, wallets, or databases for your validator.

Local Node vs Remote Node

Minus - VPS cloud hosts like or AmazonWebServices are by nature more centralized.

Plus - As secure as your home and personal

Setup Ubuntu

To install Ubuntu Server or Desktop, refer to this .

Recommendation: A headless (no monitor) install of Ubuntu Server on a dedicated NUC/laptop/desktop/VPS is best for ease of reliability and security. Do not use this system for email/browsing web/gaming/socials.

Tip: When installing Ubuntu Server, ensure you are selecting “Use an entire disk” on the Guided storage configuration screen. Next screen will be the Storage configuration screen, ensure your settings are using all available disk storage. A is that Ubuntu server defaults to using only 200GB.

Setup Metamask

To install Metamask, refer to

High Level Validator Node Overview

📜
👋
⚒️
👩‍💻
👨‍💻
🎗️
🏋️‍♂️
✨
🖥️
🛠️
🔥
🔥
🎭
🧩
PuTTY
guide from Makeuseof
EthStaker Knowledge Base
'Intro to Eth2 & Staking for Beginners' by Superphiz
Eth2 Study Master course
8 Things Every Eth2 validator should know.
Uninterruptible Power Supply (UPS)
RocketPool's hardware guide
Ethstaker's Hardware Examples
https://gist.github.com/yorickdowne/f3a3e79a573bf35767cd002cc977b038
guide
common issue
this guide.
Netcup
OPSEC
🚀
Client Stack
Big picture: Execution / Consensus / Validator
Ethereum Staking Node
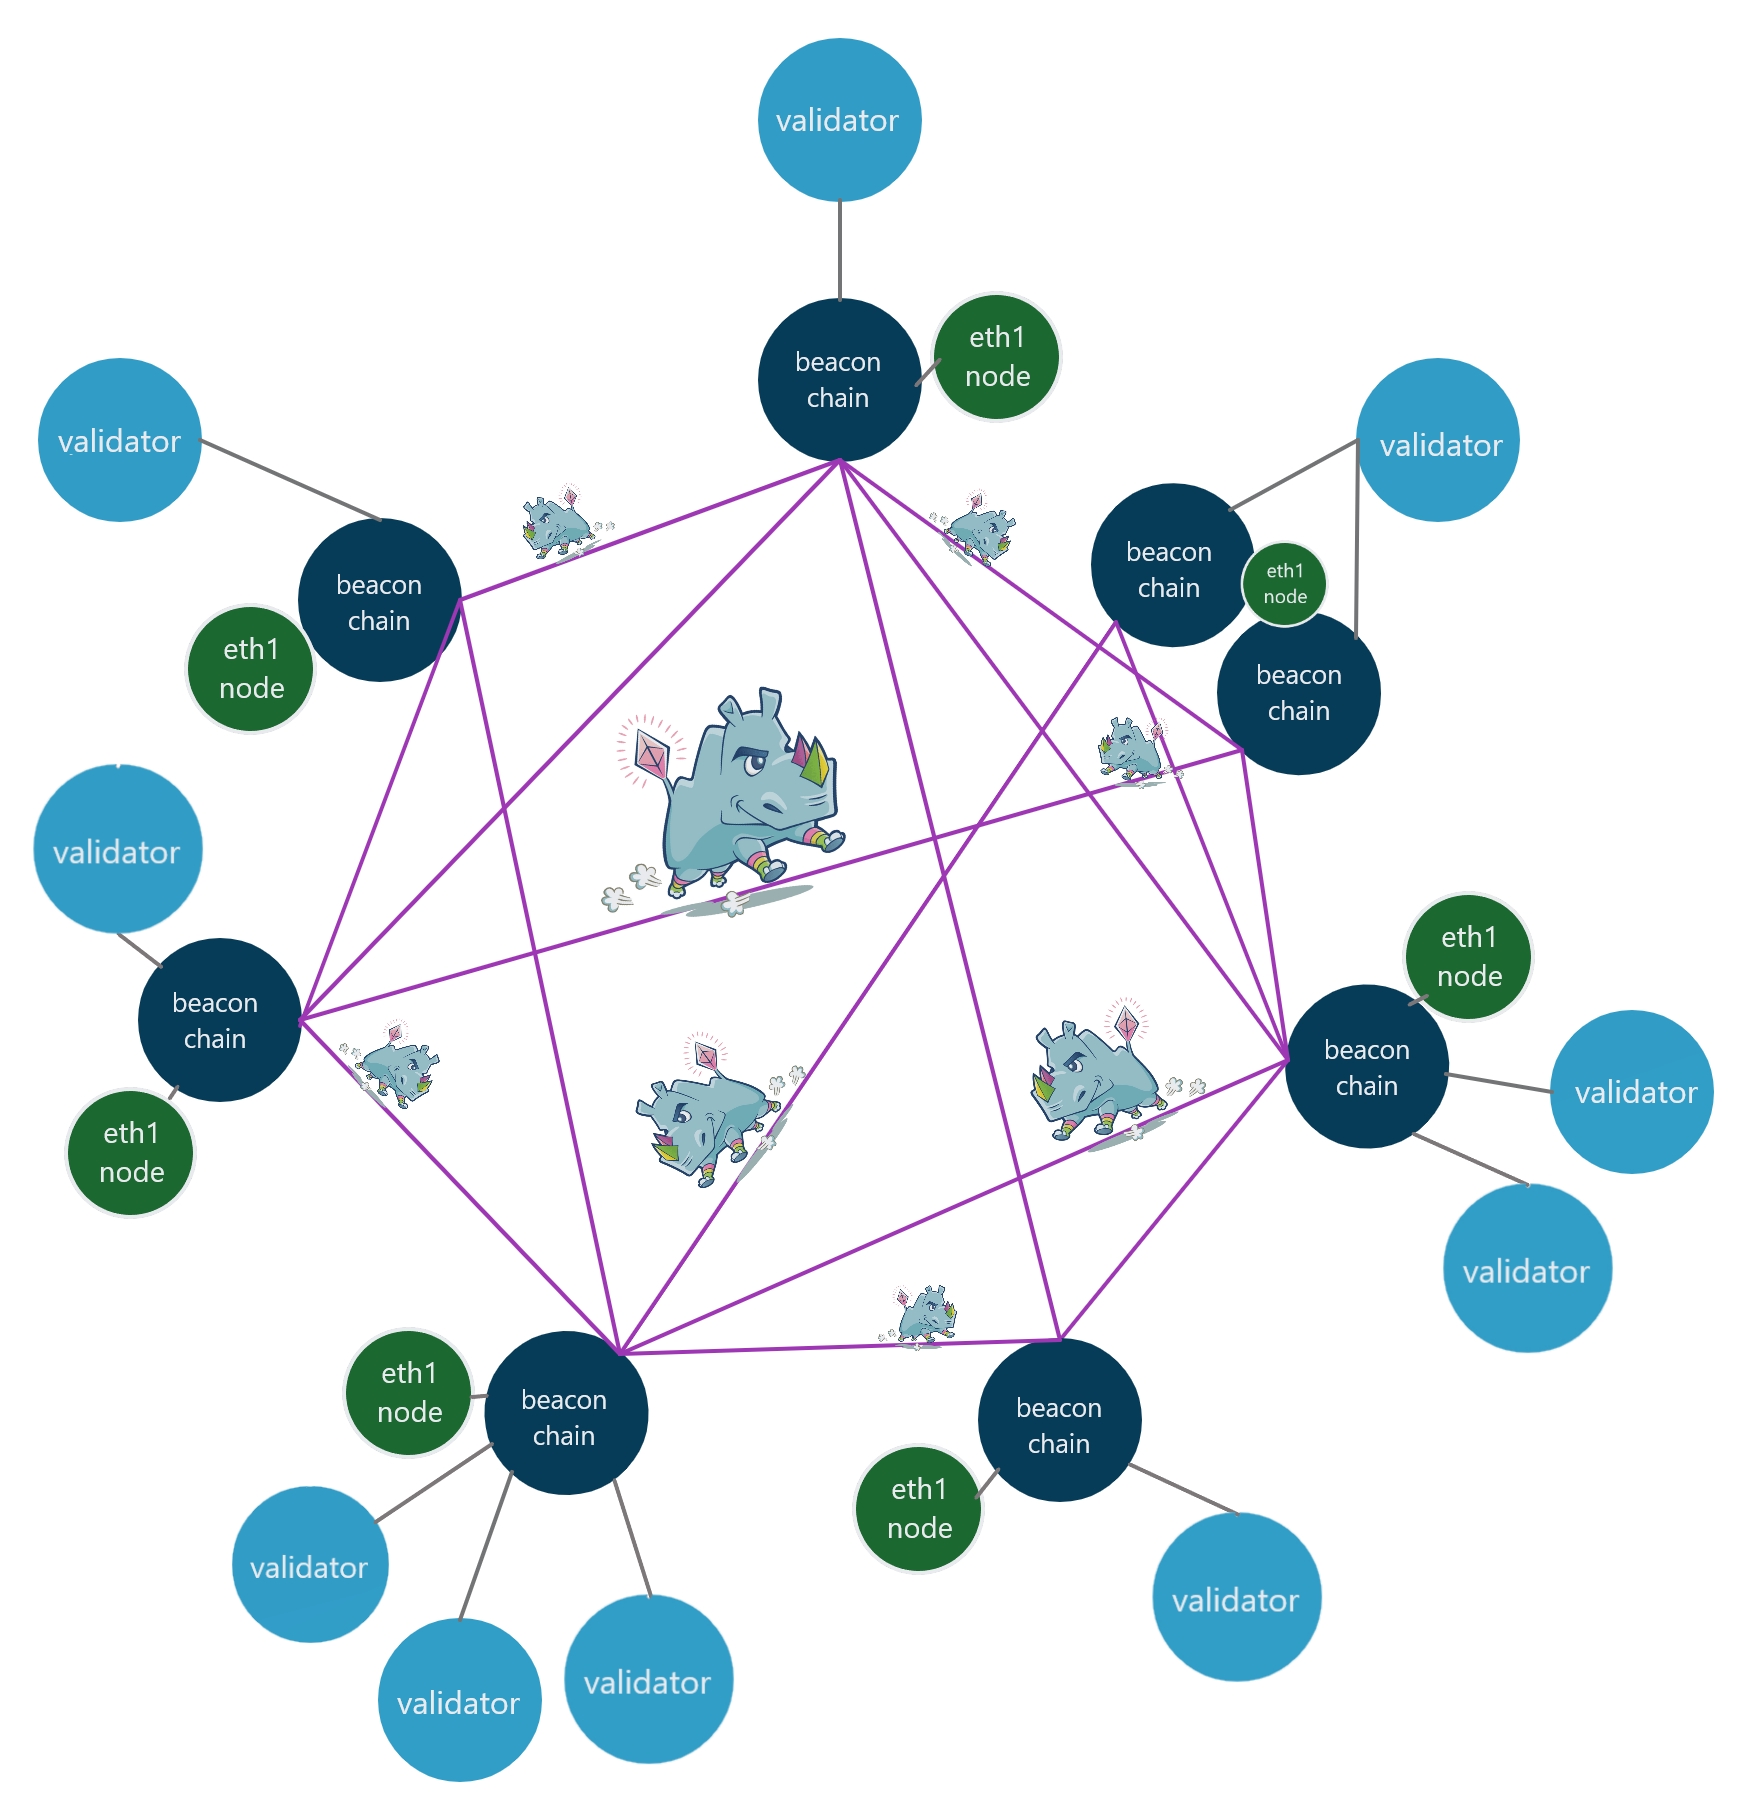
How Ethereum nodes fits together featuring Leslie the Rhino, the mascot named after American computer scientist Leslie Lamport